I appreciate my current working place, Endava, for providing me with the time and tools needed to create this blog post.
Introduction
For an introduction of the Terraform basics you can be learn from the excellent Terraform documentation
The scope of this is related with learned lessons or things that I wish I knew before working with Terraform that may help to save some time before starting using Terraform on a project.
Always use Terraform
Terraform is a tool for building, changing and versioning infrastructure safely and efficiently, helping you to define your Infrastructure as Code (IaC). Using Terraform and then making changes with other tools besides Terraform (eg Web Consoles, CLI Tools, or SDK) will create inconsistencies and affect the stability and confidence of the infrastructure.
Terraform will try to maintain the previously defined state, and any of the manual changes won’t be on the defined VCS, so if a redeployment is required, those changes will be lost.
Exceptions can be necessary, but these are only for specific needs like security restrictions (Key Pairs) or the specific debugging of issues (security group rules). But keep in mind that these changes should affect controlled components.
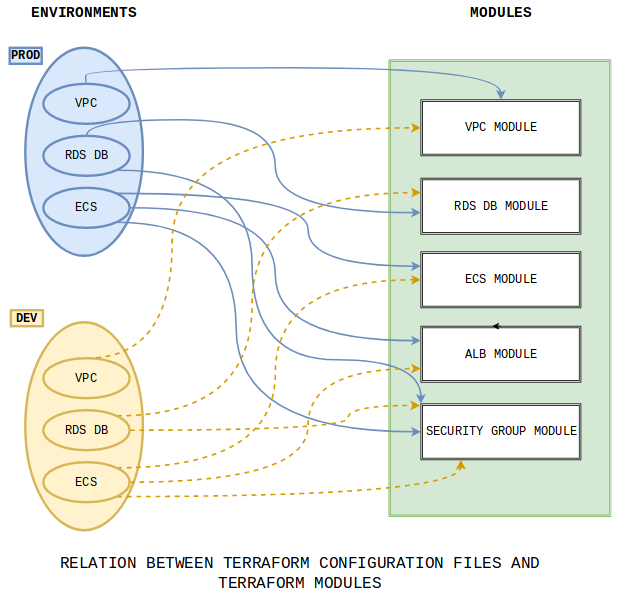
Use Modules to avoid repetitive work
How do you avoid having to copy and paste the code for the same app deployed in multiple environments, such as stage/services/frontend-app and prod/services/frontend-app?
Modules in Terraform allow you to reuse predefined resource structures. Using modules will decrease the snowflake effect and provide a great way to reuse existing infrastructure code.
Modules have some variables as inputs, which are located in different places (eg. A different folder, or even a different repository). They define elements from a provider and can define multiple resources in themselves:
|
|
Modules are called using the module block in our Terraform configuration file, variables are defined according to the desired requirement. In the example above, we call the module twice but with different values for each different environment.
This uses the module my_module and creates an AutoScaling Group with a minimum instance size of 1 and maximum of 2 and a Launch Configuration. Both resources are defined with a specific prefix name, in this case dev:
|
|
Afterwards, we can reuse the module. In our production environment, we call the same module my_module, and create the ASG with a minimum size of instances of 2 and maximum of 4, and the Launch Configuration, both with the specified prod prefix.
|
|
It’s recommended to define and use different versions of a specific module which allows us to work using a version control system.
If we store our modules in a VCS, for example git, we can use tags or branches names to call a specific version using the ?ref= option:
|
|
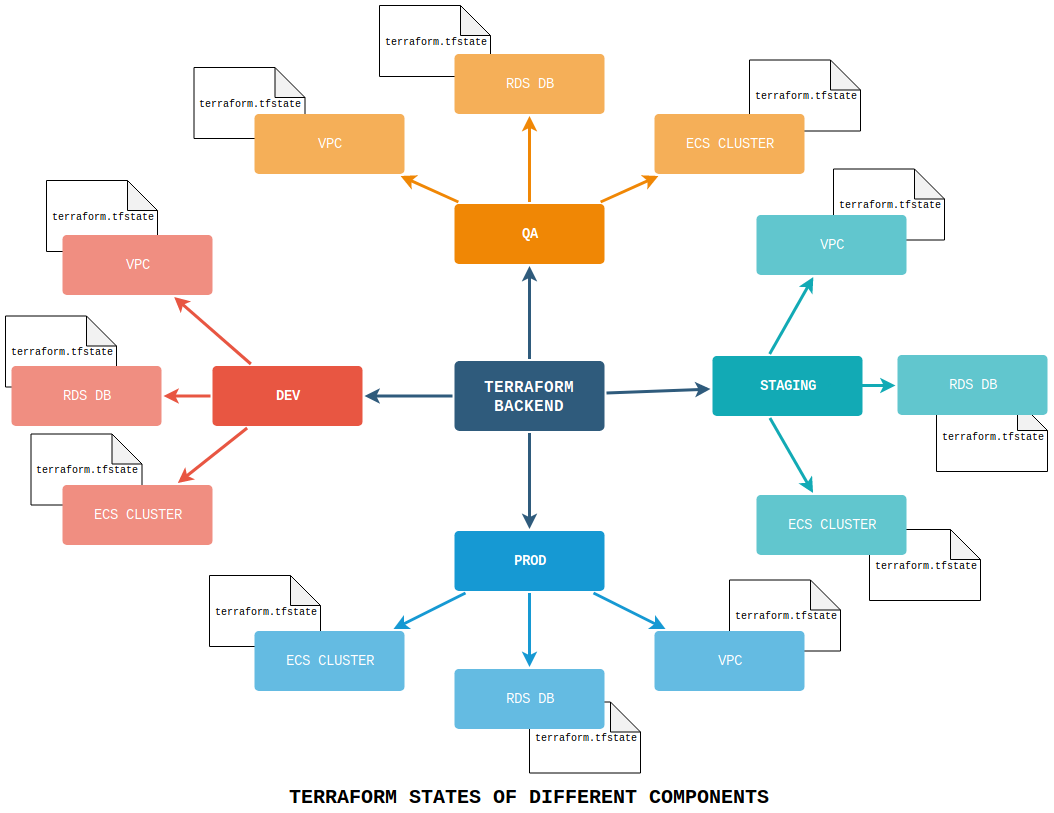
Manage Terraform State
The Terraform state file is important for Terraform because all the current states of our Infrastructure are stored here. It’s a .json file normally located in the hidden folder .terraform inside your Terraform configuration files (.terraform/terraform.tfstate) and is autogenerated when you execute the command terraform apply. The direct file editing of the state file is not recommended.
This is an example of a terraform.tfstate file:
|
|
As we work on our infrastructure, other collaborators might need to modify the infrastructure and apply their changes, changing the Terraform state file, which is why we recommend that this file be stored in a shared storage. Terraform supports multiple Backends to store this file, like etcd, azurem, S3 or Consul.
This is an example of how to define the path of the Terraform State file using the S3 provider. A DynamoDB is also used to control the lock access to the file, needed in case someone else is editing the Infrastructure at the same time. This will lock the write access to just one user at a time.
|
|
As the Terraform state file could store delicate information, it’s recommended to encrypt the Storage using the options provided by the Backends.
Also, as your Infrastructure grows and you need to define multiple environments, you might need to split your Terraform state by environments and by components inside each environment. This way you will be able to work on different environments at the same time and multiple collaborators could work on different components of the same Infrastructure without being locked (one user modifying Databases and another modifying Load Balancers). This can be achieved using the specific key component in the Backend definition:
|
|
|
|
|
|
Split everything
I mentioned earlier, splitting the Terraform state by Environments and by Components will help you build all the different components of you infrastructure in isolation from each other. What kind of division should you manage? That depends on the size of the project, its complexity and the size of your team.
For example, some components options can be defined inside themselves as inline blocks. But sometimes it’s recommended to define these structures in a different resource. In this example an AWS Route Table has the routes definition inline:
|
|
Alternatively, you can create the exact same route as a separate AWS Route resource:
|
|
This allows you to be more flexible in the definition of your Infrastructure as it increases in complexity. Just keep in mind that it’s easier to group components once they are defined, rather than splitting them after you have already deployed your Infrastructure.
As the level of complexity increases, you can deploy all your infrastructure with one command, using Bash scripts or tools like Ansible or Terragrunt.
Defining Outputs
Outputs show the information needed after Terraform templates are deployed. They are also used within modules to export information..
|
|
When used within modules, two outputs must be defined, one in the module and a similar one in the configuration files. These outputs need to be explicitly defined. Output information is stored in a Terraform state file and can be queried by other terraform templates.
It’s recommended to define Outputs for resources even if you are not using them at the time. Check the resource and the outputs provided by the resource and choose wisely which information will be useful for your infrastructure when you are using this Terraform resource. By doing so, you will decrease the need to go back and edit your module and your resource because an output is required by a new resource that you are defining.
Also, as you may want to organize your files, you can save the outputs files in a specific file called outputs.tf.
Define even the Smallest Components
When you use Terraform there is a tendency to start by focusing on the larger components, meaning that sometimes you miss smaller components that can cause frustration and technical debt. During the creation of components, Terraform will use the default options of the provider that you are using, if these are not predefined. It’s important to acknowledge the default components in use and define them in Terraform, as it’s possible that you need them in the future and default options may be modified by your chosen providers with no notice, resulting in two different component sets or changes in the properties of the components.
Examples of these include the Route Tables, which are sometimes not a focus area at the beginning of a project, or Elastic Container Repositories, which are easy to define but not always top of mind.
|
|
Terraform interpolations
The interpolation syntax is a powerful feature which allows you to reference variables, resource attributes, call functions, etc.
|
|
When you need to retrieve data from a module output or from the state of particular resources, you can use the module. or the data. syntax to call the desired attributes.
|
|
You can also use some arithmetic or logical operations with interpolation. In this snip of code, if the evaluation of var.something is true (1, true) the VPN resource will be included.:
|
|
You can find more information about the supported Interpolations in the Terraform documentation
Environment management
Folders structure
One simple and useful option is to define components inside folders by environment.
|
|
Advantages:
- Clear definition of the environment being deployed (in the folder path)
- Most commonly used and fail-proof option for public deployments
- Terraform States can be defined for each environment folder with no issues
- Specify the name of the outputs for each environment
Issues:
- Duplicated code
- An overwhelming number of folders for larger projects
- Copying of code and replacing of core values is always needed
Workspaces in Terraform
Initially, these were known in Terraform version 0.9 as Environments, but since version 0.10 onwards, Terraform has renamed this feature to Workspaces
It is possible to define new workspaces, change workspaces or delete workspaces using the terraform workspace command.
|
|
Advantages:
- They are defined by Hashicorp, so it’s possible that improved features could be developed in the future
- They reduce the usage of code
Issues:
- They are still an early implementation
- They are not yet supported by all backends
- It is not clear at the time of deployment (terraform apply) which workspace will be used (terraform workspace show)
DVCS Branch for each environment
It’s possible to manage the different environments for Terraform deployments using Branching. But this will have issues and advantages:
Advantages:
- Usage of git flow
Issues:
- In each branch, the value for Terraform state storage must be modified always
- Not clear at the moment of deployment (terraform apply) which environment is really being affected (check environment git status, git branch)
- Not too easy to define variables, as before in each merge the values should be specified for the wanted environment and reversed after a merge
Which one should you choose? It depends. The first one, the folder structure by environments is easy and simple to use, but other environment management can be better. But check the folder structure on the folder structure, it’s a recommended way to split the different components of your infrastructure.
Recommended Workflow for Commands
The terraform command has multiple options, so I wanted to share this as a recommended workflow at the moment of deployment:
-
Download the modules and force the update
The command
terraform initinitialises the workspace, downloading the providers, modules and setting up the terraform state backend. But if a module is already downloaded, Terraform won’t recognise that a new version of a module is available. Withterraform getit is possible to download the modules, but it’s recommended to use the-updateoption to force an update1terraform get -update -
Once that you have the latest modules, is necessary to initialise the Terraform workspace to start downloading the providers and modules (already completed through the first command) and initialise the terraform state backend
1terraform initIt’s possible to also use the
-upgradeoption to force the update of providers, plugins and modules. -
Prior deployment, Terraform is able to define a plan for deployment (what will be created, modified or destroyed). This plan is useful to use in a Pipeline to check the changes before initialising the real deployment.
It’s important to note that the plan option is not always 1:1 with the deployment. If a component is already deployed, or if there are not enough permissions provided, the plan will pass but the deployment could fail.
1terraform planTo simplify things, it’s possible to run all in one bash line:
terraform get -update && terraform init && terraform plan -
When you reach the final deployment step, Terraform will create a plan and provide the option to respond with yes or no to deploy the desired architecture.
1terraform applyTerraform can’t rollback after deployment. So, if an error appears in the deployment, the issue should be solved in that moment. Also, is possible to destroy the deployment (
terraform destroy), but it will destroy everything and not rollback the changes.It’s possible to specify the application of a specific change or to destroy a specific resource with the option
-target.
Calling External Data
The use of data sources allows a Terraform configuration to build on information defined outside of Terraform, or defined by another separate Terraform configuration, including:
-
Data from a remote state, this is useful to call states from another terraform deployments:
1 2 3 4 5 6 7 8data "terraform_remote_state" "vpc_state" { backend = "s3" config { bucket = "ci-cd-terraform-state" key = "vpc/terraform.tfstate" region = "us-east-1" } } -
Data from AWS or external systems:
1 2 3 4 5 6 7 8 9 10 11 12 13 14 15data "aws_ami" "linux" { most_recent = true filter { name = "name" values = ["amzn2-ami-hvm-2.0.20180810-x86_64-gp2*"] } filter { name = "virtualization-type" values = ["hvm"] } owners = ["137112412989"] }
Little issues and how to handle them
Timeouts
Network timeouts can occur because of latency in network connection to Cloud Providers, there is also the time of some operations that should be managed.
This can be managed using the timeouts option inside the Terraform resources.
|
|
Also, if the timeout operation is not defined and you had issues related to incomplete deployments, another terraform apply execution may solve the issues.
Dependencies
Terraform can handle dependencies between items, but sometimes some resources need to be defined after the deployment of another resource. Examples of this could be the Target Groups and Application Load Balancer relationship, the option depends_on on Terraform can help to create interdependence:
|
|
Sometimes it’s also possible to “solve” this redeploying the infrastructure, as Terraform saves the state of your Infrastructure, there is no issue to redeploy your infrastructure.
Remaining lock states
It’s possible to have issues on the machine deploying the infrastructure and, as a result of that lock, status can be defined creating a “deadlock”. This can be solved by editing the states backend and removing the remaining wrong value.
This can be dangerous and should be double checked before making changes
New and interesting stuff
Terratest
To test your code, you can use the great tool called Terratest. This tools uses Go’s unit testing framework.
Terraform version 0.12
The next Terraform version was announced a few months ago and will improve some interpolation and bring some changes to the HCL language.
Crossposting
This blog post was split in two parts and was available in the official Endava Engineering blog:
Part one: https://blog.endava.com/en/Engineering/2019/11-Things-I-wish-I-knew-before-working-with-Terraform-I
Part two: https://blog.endava.com/en/Engineering/2019/11-Things-I-wish-I-knew-before-working-with-Terraform-II
You can also find my profile there.